<?xml version="1.0" encoding="utf-8"?><feed xmlns="http://www.w3.org/2005/Atom" xml:lang="de"><generator uri="https://jekyllrb.com/" version="4.3.4">Jekyll</generator><link href="https://www.kai-wolf.me/feed.xml" rel="self" type="application/atom+xml" /><link href="https://www.kai-wolf.me/" rel="alternate" type="text/html" hreflang="de" /><updated>2026-09-10T17:15:50+01:00</updated><id>https://www.kai-wolf.me/feed.xml</id><title type="html">KWC Software Engineering</title><subtitle>Senior Software-Engineering und Technical Leadership für Embedded-, Industrie- und Medizinsoftware. Softwarearchitektur, C/C++, Computer Vision &amp; KI, Produkt-Cybersecurity und regulierte Entwicklung von der Architektur bis zur Auslieferung.</subtitle><entry><title type="html">CRA-Readiness: Eine Engineering-Checkliste für Hersteller vernetzter Produkte</title><link href="https://www.kai-wolf.me/insights/2026/09/10/cra-readiness-engineering-checkliste/" rel="alternate" type="text/html" title="CRA-Readiness: Eine Engineering-Checkliste für Hersteller vernetzter Produkte" /><published>2026-09-10T09:00:00+01:00</published><updated>2026-09-10T09:00:00+01:00</updated><id>https://www.kai-wolf.me/insights/2026/09/10/cra-readiness-engineering-checkliste</id><content type="html" xml:base="https://www.kai-wolf.me/insights/2026/09/10/cra-readiness-engineering-checkliste/"><![CDATA[<p>Seit dieser Woche ist der Cyber Resilience Act keine Ankündigung mehr. Ab dem</p>
<ol>
  <li>September 2026 müssen Hersteller aktiv ausgenutzte Schwachstellen und
schwere Sicherheitsvorfälle binnen 24 Stunden an die ENISA und das zuständige
CSIRT melden, und zwar auch für Produkte, die längst im Markt sind. Ab dem</li>
  <li>Dezember 2027 gilt die Verordnung dann vollständig, inklusive
Konformitätsbewertung und CE-Kennzeichnung. Betroffen ist fast alles, was
direkt oder indirekt vernetzbar ist: IoT-Geräte, Maschinensteuerungen,
Embedded-Linux-Systeme, auch reine Software. Die harmonisierten Normen, die
die Anforderungen eigentlich konkretisieren sollen, hängen derweil in der
Abstimmung fest. Man muss also anfangen, bevor die offizielle Messlatte im
Amtsblatt steht.</li>
</ol>

<p>Ich habe die Anforderungen in den letzten Wochen einmal gegen meine eigene
Projekthistorie gehalten und dabei gemerkt: Vieles davon habe ich in den
letzten Jahren bereits gebaut. Es hieß nur nicht CRA, sondern schlicht
solides Engineering. Die meisten Texte zum CRA sind aus juristischer Sicht
geschrieben, welche Artikel, welche Fristen, welche Bußgelder. Meiner hier
ist aus der Engineering-Sicht geschrieben, denn am Ende entscheidet sich
CRA-Konformität nicht im Rechtsgutachten, sondern in der Build-Infrastruktur,
der Architektur und im Entwicklungsprozess. Sechs Punkte, jeweils mit dem,
was ich dazu in Projekten erlebt habe.</p>

<h2 id="1-wissen-was-betroffen-ist-und-wie-stark">1. Wissen, was betroffen ist und wie stark</h2>
<p>Bevor irgendein Werkzeug angeschafft wird, gehört das Produktportfolio einmal
ehrlich sortiert: Welche Produkte fallen unter den CRA? Welche sind der
Standardfall mit Selbstbewertung, welche gelten als „wichtig” oder „kritisch”
und brauchen ein strengeres Bewertungsverfahren? Und welche sind zwar schon
im Markt, fallen aber trotzdem unter die neuen Meldepflichten?</p>

<p>Die Einstufung entscheidet über den gesamten weiteren Aufwand. Gerade die
Grenzfälle (Fernzugriff? Sicherheitsfunktion?) sollte man früh und schriftlich
entscheiden, sonst diskutiert man sie später unter Zeitdruck mit der Benannten
Stelle.</p>

<h2 id="2-die-sbom-muss-aus-dem-build-kommen-nicht-aus-excel">2. Die SBOM muss aus dem Build kommen, nicht aus Excel</h2>
<p>Der CRA verlangt eine Software Bill of Materials in einem maschinenlesbaren
Format, mindestens über die direkten Abhängigkeiten, aktuell zu halten über
die gesamte Supportdauer. Das Problem daran ist selten das Format. In fast
jedem gewachsenen C++-Projekt, das ich übernommen habe, lagen die
Abhängigkeiten als einkopierte Quelltexte, eingecheckte Binärdateien oder
Archive auf dem Netzlaufwerk herum. Eine SBOM wäre dort eine Momentaufnahme
von Hand gewesen, beim nächsten Release gleich wieder falsch.</p>

<p>Bei zwei Kunden, einem großen Automobilzulieferer und einem
Medizintechnik-Hersteller, habe ich das über Conan gelöst, den Paket- und
Dependency-Manager für C und C++. Conan löst bei jedem Build ohnehin den
vollständigen Abhängigkeitsgraphen auf, und aus genau diesem Graphen fällt
die SBOM (bspw. im CycloneDX-Format) automatisch heraus. Niemand pflegt ein
Dokument, die SBOM ist ein Build-Artefakt wie die Binaries auch.</p>

<p>Der eigentliche Gewinn liegt ohnehin im Weg dorthin: Wer seine Abhängigkeiten
so weit im Griff hat, dass eine SBOM automatisch entstehen kann, kann auch
die Frage beantworten, die als nächstes kommt, nämlich was überhaupt im
eigenen Produkt steckt.</p>

<h2 id="3-schwachstellen-in-fremdkomponenten-monitoring-statt-zufallsfund">3. Schwachstellen in Fremdkomponenten: Monitoring statt Zufallsfund</h2>
<p>Die SBOM ist nur die Inventur. Der CRA verlangt zusätzlich, dass Produkte
ohne bekannte ausnutzbare Schwachstellen ausgeliefert werden und dass
bekannte Schwachstellen über die Supportdauer behandelt werden. Praktisch
heißt das: die eigenen Komponenten laufend gegen die CVE-Datenbanken
abgleichen und die Treffer dokumentiert bewerten („betrifft uns / betrifft
uns nicht, weil …”).</p>

<p>Bei einem Hersteller von Laborautomatisierung habe ich das für ein
Yocto-basiertes Embedded-Linux-System eingerichtet. So ein Image zieht
schnell einige hundert Pakete nach sich, von Hand ist da nichts zu
überwachen. Yocto bringt dafür aber schon alles mit: <code class="language-plaintext highlighter-rouge">INHERIT += "cve-check"</code>
in der Konfiguration, <code class="language-plaintext highlighter-rouge">bitbake -c cve_check &lt;recipe&gt;</code> im Build, und der
Abgleich gegen bekannte Schwachstellen läuft als ganz normales Build-Target.
Heraus kommt eine Liste offener CVEs pro Rezept. Damit kann ein Team arbeiten
und priorisieren, mit einer diffusen Sorge kann es das nicht.</p>

<p>Das Werkzeug ist austauschbar, das Muster nicht: Die Schwachstellenprüfung
gehört in den Build oder die CI, nicht in einen Quartalstermin.</p>

<h2 id="4-updates-im-feld-ohne-vertrauenskette-kein-update-pfad">4. Updates im Feld: ohne Vertrauenskette kein Update-Pfad</h2>
<p>Der CRA verlangt außerdem Sicherheitsupdates über die Supportdauer von
mindestens fünf Jahren, bei längerer Produktlebensdauer entsprechend mehr.
Für Geräte im Feld braucht es also einen Update-Mechanismus, der existiert
und der nicht selbst zum Einfallstor wird. Ein Update-Kanal, der beliebige
Images akzeptiert, ist schlimmer als keiner.</p>

<p>Für einen Hersteller von elektronischen Wegfahrsperren haben wir das
seinerzeit über eine klassische PKI-Vertrauenskette gelöst: Die
Firmware-Images werden beim Build kryptografisch signiert, der Bootloader
trägt das zugehörige Schlüsselmaterial und startet ausschließlich korrekt
signierte Images. Bootloader und Firmware sind damit fest aneinander
gebunden, ein Update ohne gültige Signatur läuft schlicht nicht an. Nichts
davon ist exotisch. Aber es muss von Anfang an in der Architektur stecken,
nachträglich bekommt man Secure Boot nur mit erheblichem Aufwand in eine
Geräteflotte.</p>

<p>Die unbequeme Frage für Bestandsprodukte lautet deshalb: Gibt es für jedes
Gerät, das in fünf Jahren noch im Feld sein wird, überhaupt einen Weg, ein
Update sicher auszurollen? Wenn nein, ist das die teuerste Lücke auf dieser
Liste.</p>

<h2 id="5-security-testing-gehört-in-den-entwicklungsprozess-nicht-ans-ende">5. Security-Testing gehört in den Entwicklungsprozess, nicht ans Ende</h2>
<p>„Secure by Design” aus Anhang I klingt abstrakt. Konkret wird es mit einer
einfachen Frage: Was findet Schwachstellen im eigenen Produkt zuerst, der
eigene Prozess oder ein Fremder?</p>

<p>Bei einem großen Sensorhersteller habe ich dafür über mehrere Projekte hinweg
drei Ebenen kombiniert. <code class="language-plaintext highlighter-rouge">nmap</code> gegen die eigenen Geräte, um die tatsächliche
Angriffsfläche zu sehen, bspw. offene Ports und Dienste, von denen im Zweifel
nicht einmal das Entwicklungsteam alle kennt. Fuzzing gegen die
Schnittstellen, um die Eingabeverarbeitung automatisiert mit Fehleingaben zu
konfrontieren. Und Address-, Memory- und Thread-Sanitizer im regulären Build-
und Testablauf, damit ganze Fehlerklassen wie Speicherfehler oder Data Races
auffallen, bevor daraus eine ausnutzbare Schwachstelle wird.</p>

<p>Nichts davon ist rocket science, und genau das ist der Punkt: Die Werkzeuge
existieren, sind größtenteils frei verfügbar und laufen in jeder CI. Der
Unterschied zwischen „Secure by Design” und Papierwerk ist, ob sie bei jedem
Merge laufen oder in einem Konzeptdokument stehen.</p>

<h2 id="6-die-24-stunden-frage-wer-meldet-eigentlich">6. Die 24-Stunden-Frage: Wer meldet eigentlich?</h2>
<p>Der am schlechtesten vorbereitete Punkt, und ab dem 11. September der
akuteste. Die Meldepflicht verlangt eine Frühwarnung binnen 24 Stunden,
nachdem der Hersteller von einer aktiv ausgenutzten Schwachstelle Kenntnis
erlangt. Dafür muss es im Unternehmen jemanden geben, bei dem diese Kenntnis
zusammenläuft, der bewerten darf und der melden kann.</p>

<p>In keinem meiner Projekte gab es diese Person. Es gibt den Support, es gibt
die Entwicklung, es gibt vielleicht einen Informationssicherheitsbeauftragten
für die IT. Aber auf die Frage „bei wem landet es, wenn ein Kunde eine
ausgenutzte Schwachstelle im Produkt meldet, und wer meldet binnen 24 Stunden
weiter?” habe ich nie eine spontane Antwort bekommen.</p>

<p>Immerhin: Das ist die am schnellsten schließbare Lücke der Liste. Eine
benannte Person plus Stellvertretung, ein dokumentierter Eskalationsweg vom
Support bis zur Meldung, einmal durchgespielt. Das ist ein Nachmittag Arbeit.
Die Alternative ist, den Prozess zum ersten Mal im Ernstfall unter Zeitdruck
zu improvisieren.</p>

<h2 id="womit-anfangen">Womit anfangen?</h2>
<p>Wenn alles gleichzeitig wichtig aussieht, sortiere ich nach Risiko und
Vorlaufzeit:</p>

<ol>
  <li><strong>Meldeprozess und Verantwortlichkeit.</strong> Die Pflicht gilt bereits, der
Aufwand ist klein.</li>
  <li><strong>Bestandsaufnahme und Einstufung des Portfolios.</strong> Sie bestimmt den
Umfang von allem Weiteren.</li>
  <li><strong>Dependency-Management und SBOM.</strong> Darauf bauen Schwachstellenmanagement
und technische Dokumentation auf.</li>
  <li><strong>Update-Pfad für Feldgeräte.</strong> Die größte Architekturfrage, deshalb früh
anfangen.</li>
  <li><strong>Security-Testing in der CI und Threat Modelling.</strong> Danach
kontinuierlich, nicht einmalig.</li>
</ol>

<p>Der Dezember 2027 klingt weit weg. Wer aber heute ein Produkt entwickelt, das
dann auf den Markt kommt, trifft die relevanten Architekturentscheidungen
jetzt. Genau diese Bestandsaufnahme mache ich inzwischen als eigenes Format:
das <a href="/leistungen/produkt-cybersecurity/">CRA-Readiness-Assessment</a>.</p>]]></content><author><name>Kai Wolf</name></author><category term="security" /><category term="CRA" /><category term="SBOM" /><category term="Embedded" /><summary type="html"><![CDATA[Seit dieser Woche ist der Cyber Resilience Act keine Ankündigung mehr. Ab dem September 2026 müssen Hersteller aktiv ausgenutzte Schwachstellen und schwere Sicherheitsvorfälle binnen 24 Stunden an die ENISA und das zuständige CSIRT melden, und zwar auch für Produkte, die längst im Markt sind. Ab dem Dezember 2027 gilt die Verordnung dann vollständig, inklusive Konformitätsbewertung und CE-Kennzeichnung. Betroffen ist fast alles, was direkt oder indirekt vernetzbar ist: IoT-Geräte, Maschinensteuerungen, Embedded-Linux-Systeme, auch reine Software. Die harmonisierten Normen, die die Anforderungen eigentlich konkretisieren sollen, hängen derweil in der Abstimmung fest. Man muss also anfangen, bevor die offizielle Messlatte im Amtsblatt steht.]]></summary></entry><entry><title type="html">Optimizing my home and work network setup</title><link href="https://www.kai-wolf.me/insights/2024/12/01/network-upgrade/" rel="alternate" type="text/html" title="Optimizing my home and work network setup" /><published>2024-12-01T14:49:37+00:00</published><updated>2024-12-01T14:49:37+00:00</updated><id>https://www.kai-wolf.me/insights/2024/12/01/network-upgrade</id><content type="html" xml:base="https://www.kai-wolf.me/insights/2024/12/01/network-upgrade/"><![CDATA[<p>After analyzing my network setup in a previous post, I decided it was time to
dig deeper and optimize my network setup, both at home and at my office. With
data-intensive workflows becoming more demanding - especially in areas like
deep learning and computer vision - every millisecond and megabit counts.</p>

<p>Following is a detailed breakdown of the changes I made, the tools I used and
the performance gains I achieved.</p>

<h2 id="baseline-measurements">Baseline Measurements</h2>

<p>At home I am using a less powerful network setup for obvious reasons:</p>

<h3 id="home-network">Home Network</h3>

<p><img src="/assets/img/blog/network-setup-home.webp" alt="Network-Setup-Home" title="Netowrk
Setup Home" class="mx-auto d-block" /></p>

<ul>
  <li>ISP: DSL 250</li>
  <li>Router: FritzBox 7590 AX</li>
  <li>Ethernet: Directly connected to the router or</li>
  <li>Wi-Fi: FritzBox mesh network via a Fritz!Repeater 3000</li>
  <li>Speed test:
    <ul>
      <li>Ethernet: 183 Mbps download, 39 Mbps upload, 6.5 ms latency</li>
      <li>Wi-Fi: 181 Mbps download, 37 Mbps upload, 9.8 ms latency</li>
    </ul>
  </li>
</ul>

<h3 id="work-network">Work Network</h3>

<p>At work I am running a bit more sophisticated setup:</p>

<p><img src="/assets/img/blog/network-setup-work.webp" alt="Network-Setup-Work" title="Netowrk
Setup Work" class="mx-auto d-block" /></p>

<ul>
  <li>ISP: Vodafone Cable 1000</li>
  <li>Setup: 2.5 GBit Ethernet via CalDigit TS4 hub connected to my MacBook</li>
  <li>Server Rack: Includes a 1 GBit switch and a Proxmox application server</li>
  <li>Baseline Results (NetworkQuality):
    <ul>
      <li>Uplink: 889 Mbps</li>
      <li>Downlink: 746 Mbps</li>
      <li>Responsiveness (RPM): Medium, 487 RPM</li>
      <li>Idle Latency: ~6 ms</li>
    </ul>
  </li>
</ul>

<h2 id="improvements-and-their-impact">Improvements and Their Impact</h2>

<p>I did upgrade my server rack with a second-hand used 10G Ethernet switch from
Netgear that I’ve bought for cheap online but first I did some experiments using
the old (managed) switch first.</p>

<h3 id="leveraging-link-aggregation-lag-at-work">Leveraging Link Aggregation (LAG) at Work</h3>

<p>I configured two Ethernet ports to share the
network load (LAG) with the following results:</p>

<ul>
  <li>Uplink: 1.152 Gbps (+29.6%)</li>
  <li>Downlink: 752 Mbps (+0.8%)</li>
  <li>Responsiveness: Medium, 387 RPM (slight reduction)</li>
  <li>Idle Latency: ~6 ms (unchanged)</li>
</ul>

<p>While the uplink showed significant improvement, the downlink remained largely
unchanged. Responsiveness slightly dipped, likely due to increased protocol
overhead.</p>

<h3 id="upgrading-to-10g-ethernet-for-synology-and-proxmox">Upgrading to 10G Ethernet for Synology and Proxmox</h3>

<p>At work, I added:</p>

<ul>
  <li>A 10G module (E10G22-T1-Mini) network expansion module to my Synology RS422+</li>
  <li>A cheap 10G PCIe card for the Proxmox hypervisor</li>
</ul>

<p>With these changes I got the following results:</p>

<p><strong>Results (iperf3, Proxmox)</strong></p>
<ul>
  <li>Transfer: 2.74 GBytes</li>
  <li>Bitrate: 2.35 Gbits/sec</li>
</ul>

<p><strong>Reults (NetworkQuality, Proxmox)</strong></p>
<ul>
  <li>Uplink: 2 Gbps (+125%)</li>
  <li>Downlink:1 Gbps (+33.9%)</li>
  <li>Responsiveness: Medium, 942 RPM (+93.4%)</li>
  <li>Idle Latency: 6 ms (unchanged)</li>
</ul>

<h3 id="optimizing-mtu-for-jumbo-frames">Optimizing MTU for Jumbo Frames</h3>

<p>Adjusting the MTU from 1500 to 9000 allowed jumbo frames, increasing efficiency.</p>

<p><strong>Impact on Responsiveness</strong></p>
<ul>
  <li>Before: 942 RPM</li>
  <li>After: 1778 RPM (+88.8%)</li>
</ul>

<p>While throughput stayed constant, responsiveness doubled, indicating a
significant reduction in network packet overhead.</p>

<h3 id="introducing-the-owc-10g-thunderbilt-3-ethernet-adapter">Introducing the OWC 10G Thunderbilt 3 Ethernet Adapter</h3>
<p>Upgrading my connection to the Proxmox server and Synology rack with the OWC
adapter yielded dramatic results.</p>

<p><strong>Results (iperf3)</strong></p>
<ul>
  <li>Proxmox:
    <ul>
      <li>Transfer: 9.64 GBytes</li>
      <li>Bitrate: 8.288 Gbits/sec</li>
    </ul>
  </li>
  <li>Synology:
    <ul>
      <li>Transfer: 9.54 GBytes</li>
      <li>Bitrate: 8.19 Gbits/sec</li>
    </ul>
  </li>
</ul>

<p><strong>Results (NetworkQuality)</strong></p>
<ul>
  <li>Proxmox:
    <ul>
      <li>Uplink: 1.3 Gbps</li>
      <li>Downlink: 4.6 Gbps (+360%)</li>
      <li>Responsiveness: Medium, 421 RPM</li>
      <li>Idle Latency: 5.2 ms</li>
    </ul>
  </li>
  <li>Synology:
    <ul>
      <li>Uplink: 4.2 Gbps (+373%)</li>
      <li>Downlink: 1.7 Gbps (+70%)</li>
      <li>Responsiveness: Medium, 360 RPM</li>
      <li>Idle Latency: 4.8 ms</li>
    </ul>
  </li>
</ul>

<h3 id="home-network-upgrades-with-25g-dongles">Home Network Upgrades with 2.5G Dongles</h3>
<p>For my home setup, I added:</p>
<ul>
  <li>A 2.5G USB Ethernet dongle for the Synology DS923+ and the CalDigit TS3 hub</li>
  <li>Adjusted internal PCI sharing for stable performance</li>
</ul>

<p><strong>Results (iperf3)</strong></p>
<ul>
  <li>Transfer: 2.28 GBytes</li>
  <li>Bitrate: 1.96 Gbits/sec</li>
</ul>

<p><strong>Results (NetworkQuality)</strong></p>
<ul>
  <li>Uplink: 641 Mbps</li>
  <li>Downlink: 1.433 Gbps</li>
  <li>Responsiveness: High, 3905 RPM (+&gt;7x)</li>
  <li>Idle Latency: 4.9 ms</li>
</ul>

<p>The dongle upgrade transformed my basement rack’s performance, especially for
responsiveness and latency, despite hitting the throughout ceiling of the
2.5G connection.</p>

<h2 id="overall-performance-gains">Overall Performance Gains</h2>

<table>
  <thead>
    <tr>
      <th style="text-align: left">Metric</th>
      <th style="text-align: right">Baseline (Work)</th>
      <th style="text-align: right">Final (Work)</th>
      <th style="text-align: right">Improvement</th>
    </tr>
  </thead>
  <tbody>
    <tr>
      <td style="text-align: left">Uplink (Gbps)</td>
      <td style="text-align: right">0.889</td>
      <td style="text-align: right">4.2</td>
      <td style="text-align: right">+372.5%</td>
    </tr>
    <tr>
      <td style="text-align: left">Downlink (Gbps)</td>
      <td style="text-align: right">0.746</td>
      <td style="text-align: right">4.6</td>
      <td style="text-align: right">+516.2%</td>
    </tr>
    <tr>
      <td style="text-align: left">Responsiveness (RPM)</td>
      <td style="text-align: right">487</td>
      <td style="text-align: right">1778</td>
      <td style="text-align: right">+265%</td>
    </tr>
  </tbody>
</table>

<table>
  <thead>
    <tr>
      <th>Metric</th>
      <th style="text-align: right">Baseline (Home)</th>
      <th style="text-align: right">Final (Home)</th>
      <th style="text-align: right">Improvement</th>
    </tr>
  </thead>
  <tbody>
    <tr>
      <td>Uplink (Gbps)</td>
      <td style="text-align: right">183</td>
      <td style="text-align: right">641</td>
      <td style="text-align: right">+250%</td>
    </tr>
    <tr>
      <td>Downlink (Gbps)</td>
      <td style="text-align: right">39</td>
      <td style="text-align: right">1443</td>
      <td style="text-align: right">+3581%</td>
    </tr>
    <tr>
      <td>Responsiveness (RPM)</td>
      <td style="text-align: right">454</td>
      <td style="text-align: right">3905</td>
      <td style="text-align: right">+760%</td>
    </tr>
  </tbody>
</table>

<h2 id="key-learnings-and-next-steps">Key Learnings and Next Steps</h2>

<ol>
  <li><strong>Jumbo Frames</strong>: Enabling an MTU of 9000 dramatically improves responsiveness
without impacting throughput.</li>
  <li><strong>10G Ethernet</strong>: Investments in 10G hardware pays of, especially for
workloads like backups and Proxmox hypervisor.</li>
  <li><strong>PCI Optimization</strong>: Understanding internal bus sharing is crucial for
stable performance.</li>
</ol>

<p>Next, I plan to investiage further fine-tuning options, including QoS settings
for prioritizing critical traffic and potential upgrades to fiber internal at
home.</p>]]></content><author><name>Kai Wolf</name></author><category term="network" /><category term="quality" /><category term="devops" /><category term="iperf" /><category term="network" /><category term="synology" /><summary type="html"><![CDATA[After analyzing my network setup in a previous post, I decided it was time to dig deeper and optimize my network setup, both at home and at my office. With data-intensive workflows becoming more demanding - especially in areas like deep learning and computer vision - every millisecond and megabit counts.]]></summary><media:thumbnail xmlns:media="http://search.yahoo.com/mrss/" url="https://www.kai-wolf.me/assets/img/blog/server-rack.webp" /><media:content medium="image" url="https://www.kai-wolf.me/assets/img/blog/server-rack.webp" xmlns:media="http://search.yahoo.com/mrss/" /></entry><entry><title type="html">Analyzing network performance</title><link href="https://www.kai-wolf.me/insights/2024/11/03/network-performance/" rel="alternate" type="text/html" title="Analyzing network performance" /><published>2024-11-03T14:50:45+00:00</published><updated>2024-11-03T14:50:45+00:00</updated><id>https://www.kai-wolf.me/insights/2024/11/03/network-performance</id><content type="html" xml:base="https://www.kai-wolf.me/insights/2024/11/03/network-performance/"><![CDATA[<p>Since I am doing more data intensive work lately (Deep Learning, Computer Vision
models with hundreds of terabytes of data), I needed to analyze my current network
setup both at home and at work and identify the bottlenecks.</p>

<p>Ideally, I wanted to use <a href="https://iperf.fr/">iperf3</a> to measure throughput and a more recent
tool developed by Apple called <a href="https://support.apple.com/de-de/101942">networkQuality</a> that uses a more
<em>actionable</em> metric about the current state of the network called <strong>RPM</strong>
(Round-trips Per Minute) as this should better measure user experience specifically
when the network is under working conditions.</p>

<p>I also wanted to have these running as background services and since I am using
Synology for backup both at home and at work and the setup of these won’t change
all too often due to being critical infrastructure, they were perfect candidates.</p>

<h2 id="installing-iperf3-on-synology-nas-dsm-72">Installing iperf3 on Synology NAS (DSM 7.2+)</h2>
<p>In order to install iperf3 on the Synology NAS we have to add another package
repository called <a href="https://synocommunity.com/#easy-install">SynoCommunity</a>. For this we have to log into
the DSM, Package Center -&gt; Add the repository there and then install the package
<em>SynoCli Monitor Tools</em> from the newly added repository. This also installs
the <code class="language-plaintext highlighter-rouge">iperf3</code> commandline tool. We want this to start and run automatically even
after rebooting the DSM. For this we can add another systemd service containing
the following</p>

<figure class="highlight"><pre><code class="language-bash" data-lang="bash"><span class="nv">$ </span><span class="nb">sudo </span>vi /etc/systemd/system/iperf3.service
<span class="o">[</span>Unit]
<span class="nv">Description</span><span class="o">=</span>Run iperf3 at startup
<span class="o">[</span>Service]
<span class="nv">Type</span><span class="o">=</span>simple
<span class="nv">ExecStart</span><span class="o">=</span>/usr/local/bin/iperf3 <span class="nt">-s</span>

<span class="o">[</span>Install]
<span class="nv">WantedBy</span><span class="o">=</span>multi-user.target

<span class="nv">$ </span><span class="nb">sudo </span>systemctl start iperf3.service
<span class="nv">$ </span><span class="nb">sudo </span>systemctl status iperf3.service
<span class="nv">$ </span><span class="nb">sudo </span>systemctl <span class="nb">enable </span>iperf3.service</code></pre></figure>

<p>The <code class="language-plaintext highlighter-rouge">-s</code> is for running in server mode, listening to new connections. We can now
test against this backend from another machine by specifying the endpoint:</p>

<figure class="highlight"><pre><code class="language-bash" data-lang="bash"><span class="nv">$ </span>iperf3 <span class="nt">-c</span> wolf-synology.fritz.box
Connecting to host wolf-synology.fritz.box, port 5201
<span class="o">[</span>  7] <span class="nb">local </span>192.168.178.53 port 55961 connected to 192.168.178.23 port 5201
<span class="o">[</span> ID] Interval           Transfer     Bitrate
<span class="o">[</span>  7]   0.00-1.00   sec  18.0 MBytes   151 Mbits/sec
<span class="o">[</span>  7]   1.00-2.00   sec  15.3 MBytes   128 Mbits/sec
<span class="o">[</span>  7]   2.00-3.00   sec  20.6 MBytes   172 Mbits/sec
<span class="o">[</span>  7]   3.00-4.00   sec  15.0 MBytes   126 Mbits/sec
<span class="o">[</span>  7]   4.00-5.00   sec  18.6 MBytes   156 Mbits/sec</code></pre></figure>

<h2 id="installing-networkquality-server">Installing networkQuality server</h2>
<p><a href="https://support.apple.com/de-de/101942">NetworkQuality</a> is a tool that comes preinstalled with recent
macOS versions and uses a configuration provided by Apple everytime it is called
without any additional options</p>

<figure class="highlight"><pre><code class="language-bash" data-lang="bash"><span class="nv">$ </span>networkQuality
<span class="o">====</span> SUMMARY <span class="o">====</span>
Uplink capacity: 33.018 Mbps
Downlink capacity: 167.554 Mbps
Responsiveness: Low <span class="o">(</span>454.545 milliseconds | 132 RPM<span class="o">)</span>
Idle Latency: 17.625 milliseconds | 3529 RPM</code></pre></figure>

<p>This is fine for measuring the up and downlinks from the localhost to an endpoint
in the world wide web, but for my purposes I needed to measure the performance
between to endpoints in the same network (and also respecting parallel connections
which most other tools do not bother with).</p>

<p>There exist at least two reference implementations (in Swift and Go). I used the
latter which can be found <a href="https://github.com/network-quality/goserver">here</a>. Since I wanted this to be running
in the background on my NAS, I needed to cross compile the networkqualityd binary
using a GCC cross compile toolchain:</p>

<figure class="highlight"><pre><code class="language-bash" data-lang="bash"><span class="nv">$ </span>brew <span class="nb">install </span>FiloSottile/musl-cross/musl-cross
<span class="nv">$ CC</span><span class="o">=</span>x86_64-linux-musl-gcc <span class="se">\\</span>
  <span class="nv">CXX</span><span class="o">=</span>x86_64-linux-musl-g++ <span class="se">\\</span>
  <span class="nv">GOARCH</span><span class="o">=</span>amd64 <span class="se">\\</span>
  <span class="nv">GOOS</span><span class="o">=</span>linux <span class="se">\\</span>
  <span class="nv">CGO_ENABLED</span><span class="o">=</span>1 <span class="se">\\</span>
  go build <span class="nt">-ldflags</span> <span class="s2">"-linkmode external -extldflags -static"</span></code></pre></figure>

<p>Afterwards, I did copy the binary over to my Synology and created another systemd
service as before:</p>

<figure class="highlight"><pre><code class="language-bash" data-lang="bash"><span class="nv">$ </span><span class="nb">sudo </span>vi /etc/systemd/system/networkqualityd.service

<span class="o">[</span>Unit]
<span class="nv">Description</span><span class="o">=</span>Run networkqualityd at startup
<span class="o">[</span>Service]
<span class="nv">Type</span><span class="o">=</span>simple
<span class="nv">ExecStart</span><span class="o">=</span>/usr/local/bin/networkqualityd <span class="nt">-create-cert</span> <span class="nt">-config-name</span> <span class="s2">"wolf-synology.fritz.box"</span> <span class="nt">-enable-http2</span> <span class="nt">-listen-addr</span> <span class="s2">"0.0.0.0"</span>

<span class="o">[</span>Install]
<span class="nv">WantedBy</span><span class="o">=</span>multi-user.target</code></pre></figure>

<p>With this I now could test against a local endpoint and do some further
experiments to optimize the result:</p>

<figure class="highlight"><pre><code class="language-bash" data-lang="bash"><span class="nv">$ </span>networkQuality <span class="nt">-C</span> https://wolf-synology.fritz.box:4043/.well-known/nq <span class="nt">-k</span>
<span class="o">====</span> SUMMARY <span class="o">====</span>
Uplink capacity: 68.958 Mbps
Downlink capacity: 108.231 Mbps
Responsiveness: Low <span class="o">(</span>487.805 milliseconds | 123 RPM<span class="o">)</span>
Idle Latency: 8.167 milliseconds | 7500 RPM</code></pre></figure>

<p>Clearly, these measurements have some room for potential which I will discuss
in another upcoming post.</p>

<p>I’m available for software consultancy, training and mentoring. Please
<a href="/#contact">contact me</a>, if you are interested in my services.</p>]]></content><author><name>Kai Wolf</name></author><category term="network" /><category term="quality" /><category term="devops" /><category term="iperf" /><category term="network" /><category term="synology" /><summary type="html"><![CDATA[Since I am doing more data intensive work lately (Deep Learning, Computer Vision models with hundreds of terabytes of data), I needed to analyze my current network setup both at home and at work and identify the bottlenecks.]]></summary><media:thumbnail xmlns:media="http://search.yahoo.com/mrss/" url="https://www.kai-wolf.me/assets/img/blog/network-quality.webp" /><media:content medium="image" url="https://www.kai-wolf.me/assets/img/blog/network-quality.webp" xmlns:media="http://search.yahoo.com/mrss/" /></entry><entry><title type="html">Adventures in Liquid</title><link href="https://www.kai-wolf.me/insights/2022/11/13/adventures-in-liquid/" rel="alternate" type="text/html" title="Adventures in Liquid" /><published>2022-11-13T10:00:10+00:00</published><updated>2022-11-13T10:00:10+00:00</updated><id>https://www.kai-wolf.me/insights/2022/11/13/adventures-in-liquid</id><content type="html" xml:base="https://www.kai-wolf.me/insights/2022/11/13/adventures-in-liquid/"><![CDATA[<p>Liquid is an open-source template language created by the company
Shopify, written in Ruby and used by this websites static site generator Jekyll.
This language is mainly used to create small logical units that spit out markup.
For instance, imagine that we want to display a collection of products on a
website which we have saved in a yaml file, we could express this as follows:</p>

<figure class="highlight"><pre><code class="language-liquid" data-lang="liquid">&lt;ul&gt;
  <span class="p">{%</span><span class="w"> </span><span class="nt">for</span><span class="w"> </span><span class="nv">product</span><span class="w"> </span><span class="nt">in</span><span class="w"> </span><span class="nv">collection.products</span><span class="w"> </span><span class="p">%}</span>
    &lt;li&gt;<span class="p">{{</span><span class="w"> </span><span class="nv">product</span><span class="p">.</span><span class="nv">title</span><span class="w"> </span><span class="p">}}</span>&lt;/li&gt;
  <span class="p">{%</span><span class="w"> </span><span class="nt">endfor</span><span class="w"> </span><span class="p">%}</span>
&lt;/ul&gt;</code></pre></figure>

<p>Besides loops, it also supports a minimally required set of operations such as
if/else statements and variables. Just as in <a href="https://cmake.org/">CMake</a> there are no proper
types. Essentially everything is of type string. Arrays are comma separated
strings and strings may have a <em>truthy</em> or <em>falsy</em> meaning based on the content.</p>

<p><a href="https://github.com/Shopify/liquid">Liquid</a> also ships with some convenience API functions to alter text,
which does come in handy for the case at hand. The following example converts
a given string to lowercase letters:</p>

<figure class="highlight"><pre><code class="language-liquid" data-lang="liquid"><span class="p">{{</span><span class="w"> </span><span class="s2">"FooBar"</span><span class="w"> </span><span class="p">|</span><span class="w"> </span><span class="nf">downcase</span><span class="w"> </span><span class="p">}}</span></code></pre></figure>

<p>This will output ‘foobar’ as a result.
Different operations can also be stacked together via so called <em>pipes</em> that
should be very familiar when working in a UNIX environment:</p>

<figure class="highlight"><pre><code class="language-liquid" data-lang="liquid"><span class="p">{{</span><span class="w"> </span><span class="s2">"Just the first word will be printed"</span><span class="w"> </span><span class="p">|</span><span class="w"> </span><span class="nf">split</span><span class="p">:</span><span class="w"> </span><span class="s2">" "</span><span class="w"> </span><span class="p">|</span><span class="w"> </span><span class="nf">first</span><span class="w"> </span><span class="p">}}</span></code></pre></figure>

<p>Again, this will output ‘Just’ only.</p>

<h2 id="advanced-example">Advanced example</h2>
<p>When I was in the midst of redesigning my website, I came across a slightly
more interesting use case for Liquid: As part of my portfolio I do maintain
a yaml file that contains all of my previous projects for the last decade or so.</p>

<p>Every entry in this file consists of the project name, an image, a short
description and one or more categories that this project is classified into.
As part of my consulting services that I provide, I wanted to create a list
of relevant projects that I have been working on in the past. For this I had
to select all projects that to fall into the same category.</p>

<p><img src="/assets/img/blog/categories.webp" alt="Categories" title="Project and
page categories" class="mx-auto d-block" /></p>

<p>In other words I wanted to create the intersection from two arrays: Namely,
the array with the given project categories and the array with the current
page category (which can be one or more).</p>

<p>As it turns out, Liquids limited support for types and arrays for that matter
has no operational support to create an intersection of two arrays. So I had
to come up with another approach. A brute-force method to achieve this would
consist of two concatenated loops, iterating over both arrays and remembering
which elements were already visited and removing them from the array.</p>

<p>However, this would have been way to many lines of code for my taste and didn’t
seem appropriate. Hence, I came up with the following:</p>

<figure class="highlight"><pre><code class="language-liquid" data-lang="liquid"><span class="p">{%-</span><span class="w"> </span><span class="nt">for</span><span class="w"> </span><span class="nv">project</span><span class="w"> </span><span class="nt">in</span><span class="w"> </span><span class="nv">site.data.projects</span><span class="w"> </span><span class="p">-%}</span>
  <span class="p">{%</span><span class="w"> </span><span class="nt">assign</span><span class="w"> </span><span class="nv">all_cats</span><span class="w"> </span><span class="o">=</span><span class="w"> </span><span class="nv">project</span><span class="p">.</span><span class="nv">categories</span><span class="w"> </span><span class="p">|</span><span class="w"> </span><span class="nf">concat</span><span class="p">:</span><span class="w"> </span><span class="nv">page</span><span class="p">.</span><span class="nv">category</span><span class="w"> </span><span class="p">%}</span>
  <span class="p">{%</span><span class="w"> </span><span class="nt">assign</span><span class="w"> </span><span class="nv">filtered_cats</span><span class="w"> </span><span class="o">=</span><span class="w"> </span><span class="nv">all_cats</span><span class="w"> </span><span class="p">|</span><span class="w"> </span><span class="nf">uniq</span><span class="w"> </span><span class="p">%}</span>
  <span class="p">{%-</span><span class="w"> </span><span class="kr">if</span><span class="w"> </span><span class="nv">all_cats</span><span class="p">.</span><span class="nf">size</span><span class="w"> </span><span class="o">&gt;</span><span class="w"> </span><span class="nv">filtered_cats</span><span class="p">.</span><span class="nf">size</span><span class="w"> </span><span class="p">-%}</span>
   <span class="p">{{</span><span class="nv">project</span><span class="p">.</span><span class="nv">description</span><span class="p">}}</span>
  <span class="p">{%-</span><span class="w"> </span><span class="kr">endif</span><span class="w"> </span><span class="p">-%}</span>
<span class="p">{%-</span><span class="w"> </span><span class="nt">endfor</span><span class="w"> </span><span class="p">-%}</span></code></pre></figure>

<p>First, this creates another array <code class="language-plaintext highlighter-rouge">all_cats</code> that consists of both the project
and page categories. Secondly, <code class="language-plaintext highlighter-rouge">filtered_cats</code> consists of all unique elements
from the first array. All that is left to do now is to check, if the original
array is larger than the filtered one. As an interesting side note, the actual
category isn’t even necessary anymore, as we are only interested in uniqueness.</p>

<p>On the one hand this <em>solution</em> looks admittedly a bit of a stretch. On the
other hand, given the constraints of the API this is actually a sufficient
elegant solution. For instance, the negation for the case above (the disjoint
set in other words) requires to only change the larger then operator to be less
then.</p>

<p>I’m available for software consultancy, training and mentoring. Please
<a href="/#contact">contact me</a>, if you are interested in my services.</p>]]></content><author><name>Kai Wolf</name></author><category term="software" /><category term="engineering" /><category term="frontend" /><category term="html" /><category term="css" /><category term="liquid" /><category term="jekyll" /><summary type="html"><![CDATA[Liquid is an open-source template language created by the company Shopify, written in Ruby and used by this websites static site generator Jekyll. This language is mainly used to create small logical units that spit out markup. For instance, imagine that we want to display a collection of products on a website which we have saved in a yaml file, we could express this as follows:]]></summary><media:thumbnail xmlns:media="http://search.yahoo.com/mrss/" url="https://www.kai-wolf.me/assets/img/blog/liquid.webp" /><media:content medium="image" url="https://www.kai-wolf.me/assets/img/blog/liquid.webp" xmlns:media="http://search.yahoo.com/mrss/" /></entry><entry><title type="html">Signal Processing and ML Inference on the Edge</title><link href="https://www.kai-wolf.me/insights/2021/07/19/signal-processing-ml-inference-edge-devices/" rel="alternate" type="text/html" title="Signal Processing and ML Inference on the Edge" /><published>2021-07-19T09:15:15+01:00</published><updated>2021-07-19T09:15:15+01:00</updated><id>https://www.kai-wolf.me/insights/2021/07/19/signal-processing-ml-inference-edge-devices</id><content type="html" xml:base="https://www.kai-wolf.me/insights/2021/07/19/signal-processing-ml-inference-edge-devices/"><![CDATA[<p>I was giving an (online) talk last week at the C++ Meetup in Karlsruhe. The
title of my talk was <em>Signal Processing and ML Inference on the Edge</em> where I
talk a bit about the constraints and requirements for on-device online computing
and some interesting approaches on how to implement a given algorithm using
either the (already deprecated) RenderScript as well as <a href="https://halide-lang.org/">Halide</a>.</p>

<p>At the beginning of this talk I did recapitulate some essential audio processing
basics and also introduced some typical ML related computations before
discussing different approaches using Halide for my main example. There was even
a live stream on YouTube available for this event (which is a first for me) that
you can find here:</p>

<iframe width="100%" height="315" src="https://www.youtube.com/embed/VbuChpX5OAc" frameborder="0" allow="accelerometer; autoplay; encrypted-media; gyroscope; picture-in-picture" allowfullscreen=""></iframe>

<p>Following is the Agenda of this talk used for the announcement:</p>

<h2 id="agenda">Agenda</h2>
<p>The recent decade has been revolutionary regarding many technical aspects of our
daily lives. We have experienced the transition from simplistic feature phones
to fully featured little supercomputers carried along in our pockets, capable of
performing uttermost computationally heavy tasks directly on the device.
Moreover, we are currently already in the midst of what some may call the third
AI renaissance, and are now able to solve pattern recognition problems with
relatively little effort that in the past could only be solved by humans. The
latter development has been a game changer for a variety of applications
including anomaly detection, classification or speech recognition.</p>

<p>Despite the advanced computational resources of modern mobile devices, it is
still challenging to obtain optimal throughput and minimal latency with signal
processing implementations, which typically involves exploiting device specific
acceleration techniques, such as vector intrinsics. However, this is not always
feasible, especially when targeting a large variety of different architectures
and target devices.</p>

<p>We will look at heterogeneous computing frameworks to accelerate the processing
of otherwise performance intensive tasks which will get optimized across
multi-core CPUs, GPUs or DPSs on the target device. Since Androids RenderScript
is deprecated, we will focus on alternatives namely Halide.</p>

<p>I’m also available for software consultancy, training and mentoring. Please
<a href="/#contact">contact me</a>, if you are interested in my services.</p>]]></content><author><name>Kai Wolf</name></author><category term="performance" /><category term="software" /><category term="engineering" /><category term="cpp" /><category term="halide" /><category term="cmake" /><category term="performance" /><summary type="html"><![CDATA[I was giving an (online) talk last week at the C++ Meetup in Karlsruhe. The title of my talk was Signal Processing and ML Inference on the Edge where I talk a bit about the constraints and requirements for on-device online computing and some interesting approaches on how to implement a given algorithm using either the (already deprecated) RenderScript as well as Halide.]]></summary><media:thumbnail xmlns:media="http://search.yahoo.com/mrss/" url="https://www.kai-wolf.me/assets/img/blog/signal-latency.webp" /><media:content medium="image" url="https://www.kai-wolf.me/assets/img/blog/signal-latency.webp" xmlns:media="http://search.yahoo.com/mrss/" /></entry><entry><title type="html">Bazel performance comparison with CMake</title><link href="https://www.kai-wolf.me/insights/2021/04/16/bazel-cmake-performance-comparisons/" rel="alternate" type="text/html" title="Bazel performance comparison with CMake" /><published>2021-04-16T10:45:09+01:00</published><updated>2021-04-16T10:45:09+01:00</updated><id>https://www.kai-wolf.me/insights/2021/04/16/bazel-cmake-performance-comparisons</id><content type="html" xml:base="https://www.kai-wolf.me/insights/2021/04/16/bazel-cmake-performance-comparisons/"><![CDATA[<p>Google released an open-source version of its internal build system named
<a href="http://bazel.build/">Bazel</a> already six years ago. This system is advertised (and used
effectively) to build billions of lines of code. My fundamental interest in
this tool was fueled by two key promises according to their
<a href="https://opensource.googleblog.com/2019/10/bazel-reaches-10-milestone.html">release notes</a> for the 1.0 version: <em>Hermetic</em> and <em>reproducible</em>
builds. Hermetic build in this context means that everything depends on
a known set of inputs, which is essential for ensuring that builds are
reproducible. This is achieved through several techniques such as sandboxing.
For instance, Bazel tries hard to not be dependent on anything on the host
system.</p>

<p>Reproducibility for builds on the other hand is also a must for any serious
software system used by real customers. Without it, there is no way to go
back in time and <em>reproduce</em> the state of the software to any previous
version in time. However, there are actually few shops out there I’ve come
to known personally where this is really achieved. Frankly, this is not too
easy to setup in the first place.</p>

<p>I did port some internal projects as well as a customer project from CMake
to Bazel in the last year. All those projects were of reasonable size (meaning
lines of code) and had several external dependencies. I think this is mandatory
to really get to know a new tool and push its boundaries quite a bit.</p>

<h2 id="build-time-benchmarks">Build time benchmarks</h2>
<p>One of the things I was most interested in are the build times. Suffice to say
that large C++ projects have a strong tendency to build very slowly, due to
tooling and certain language features (templates) that have never really got
up to speed since the 80s. For a build time benchmark there are three different
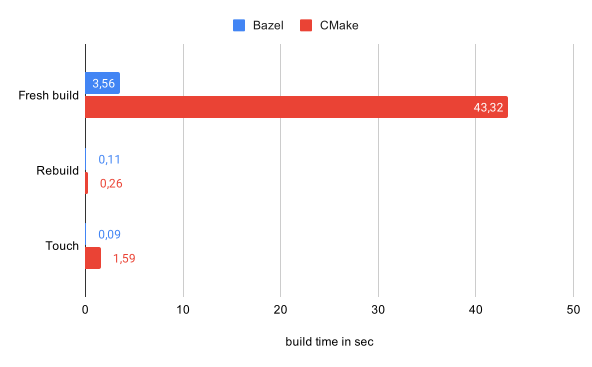
use-cases I’ve looked into: Fresh builds from scratch, rebuilds without any
changes and finally rebuilds with one file touched:</p>

<p><img src="/assets/img/blog/bazel-cmake-benchmark.svg" alt="Build time benchmark" title="Build time comparison" /></p>

<p>For testing I’ve used the most recent versions of both Bazel (3.7.2) and
CMake (3.19). This code base in particular made heavy use of <a href="https://eigen.tuxfamily.org/index.php?title=Main_Page">Eigen</a>
included as an external dependency and CMake spent some time configuring
this header-only library. Hence, this benchmark is arguably a bit skewed.
However, this is a software project I’ve had at hand and at the end of the
day these numbers count. Even if a fresh build is not considered here, Bazel
still wins in terms of performance by being twice as fast for a rebuild and
as fast as factor 17 for detecting a change (touch) and rebuilding again.
This looks promising.</p>

<p>I’m also available for software consultancy, training and mentoring. Please
<a href="/#contact">contact me</a>, if you are interested in my services.</p>]]></content><author><name>Kai Wolf</name></author><category term="performance" /><category term="software" /><category term="engineering" /><category term="cpp" /><category term="bazel" /><category term="cmake" /><category term="performance" /><summary type="html"><![CDATA[Google released an open-source version of its internal build system named Bazel already six years ago. This system is advertised (and used effectively) to build billions of lines of code. My fundamental interest in this tool was fueled by two key promises according to their release notes for the 1.0 version: Hermetic and reproducible builds. Hermetic build in this context means that everything depends on a known set of inputs, which is essential for ensuring that builds are reproducible. This is achieved through several techniques such as sandboxing. For instance, Bazel tries hard to not be dependent on anything on the host system.]]></summary><media:thumbnail xmlns:media="http://search.yahoo.com/mrss/" url="https://www.kai-wolf.me/assets/img/blog/bazel-logo.webp" /><media:content medium="image" url="https://www.kai-wolf.me/assets/img/blog/bazel-logo.webp" xmlns:media="http://search.yahoo.com/mrss/" /></entry><entry><title type="html">(Advanced) C++ Design Patterns</title><link href="https://www.kai-wolf.me/insights/2021/01/11/advanced-cpp-design-patterns/" rel="alternate" type="text/html" title="(Advanced) C++ Design Patterns" /><published>2021-01-11T08:26:10+00:00</published><updated>2021-01-11T08:26:10+00:00</updated><id>https://www.kai-wolf.me/insights/2021/01/11/advanced-cpp-design-patterns</id><content type="html" xml:base="https://www.kai-wolf.me/insights/2021/01/11/advanced-cpp-design-patterns/"><![CDATA[<p>Last week I gave a talk for the C++ User group Frankfurt regarding (Advanced)
C++ Design Patterns. Due to the pandemic this talk was given remotely. While I
still have to get used to talking to my monitor, I think overall it went pretty
smooth. There were a lot of participants which I didn’t expect (and didn’t see
for the most part). However, the Q&amp;A session after the talk was pretty decent
as well. I do hope though that I will be able to give <em>regular</em> talks again once
this Corona thing will eventually be over.</p>

<p>Concerning the contents of the talk, I tried to motivate using specific C++
related techniques over traditional (GoF) Design Patterns due to the typical
system memory and runtime constraints we’re facing when using C++ for the job
anyways. More specifically I was discussing how to use <em>static polymorphism</em>
to model the software system at hand to achieve basically the same with
dynamic polymorphism but without paying for the overhead in memory/runtime.
You can find the link to the slides
<a href="/assets/talks/advanced_cpp_design_patterns.pdf">here</a>.</p>

<p>I’m also available for software consultancy, training and mentoring. Please
<a href="/#contact">contact me</a>, if you are interested in my services.</p>]]></content><author><name>Kai Wolf</name></author><category term="performance" /><category term="software" /><category term="engineering" /><category term="cpp" /><category term="design-patterns" /><category term="performance" /><summary type="html"><![CDATA[Last week I gave a talk for the C++ User group Frankfurt regarding (Advanced) C++ Design Patterns. Due to the pandemic this talk was given remotely. While I still have to get used to talking to my monitor, I think overall it went pretty smooth. There were a lot of participants which I didn’t expect (and didn’t see for the most part). However, the Q&amp;A session after the talk was pretty decent as well. I do hope though that I will be able to give regular talks again once this Corona thing will eventually be over.]]></summary><media:thumbnail xmlns:media="http://search.yahoo.com/mrss/" url="https://www.kai-wolf.me/assets/img/blog/books.webp" /><media:content medium="image" url="https://www.kai-wolf.me/assets/img/blog/books.webp" xmlns:media="http://search.yahoo.com/mrss/" /></entry><entry><title type="html">Linux perf tools on ARM64</title><link href="https://www.kai-wolf.me/insights/2020/05/26/linux-perf-tools/" rel="alternate" type="text/html" title="Linux perf tools on ARM64" /><published>2020-05-26T14:01:37+01:00</published><updated>2020-05-26T14:01:37+01:00</updated><id>https://www.kai-wolf.me/insights/2020/05/26/linux-perf-tools</id><content type="html" xml:base="https://www.kai-wolf.me/insights/2020/05/26/linux-perf-tools/"><![CDATA[<p>For a current client project I need to get a thorough understanding of the
performance bottlenecks for several target architectures, including ARM64.
For this, I’ve already ordered an <a href="https://www.hardkernel.com/shop/odroid-c2/">ODROID-C2</a> development board. This
is currently the only ARM64 development board available that also supports
Android as far as I am aware.</p>

<p>When doing a performance analysis (especially under Linux) I really like using
<a href="https://en.wikipedia.org/wiki/Perf_(Linux)">perf</a> as it supports a wide range of options such as hw/sw performance
counters and has several useful subcommands. However, getting perf to run on a
host system also requires the kernel sources as perf will emit a warning in any
other case. Usually this can be achieved by simply fetching the sources for the
current kernel by using a package manager such as apt:</p>

<figure class="highlight"><pre><code class="language-bash" data-lang="bash"><span class="nv">$ </span>apt-get <span class="nb">install </span>linux-tools-common linux-tools-generic linux-tools-<span class="sb">`</span><span class="nb">uname</span> <span class="nt">-r</span><span class="sb">`</span></code></pre></figure>

<p>In the case of ODROID-C2 things are a bit more complicated, which is the main
motivation for this blog post. First of all, the kernel for this board is quite
old (August 2014). Hence, we probably won’t find the kernel sources from within
the package sources of our distribution, which turned out to be the case.
In this case, we need to fetch the original sources provided by ODROID and also
checkout the correct branch for the current version of this dev board:</p>

<figure class="highlight"><pre><code class="language-bash" data-lang="bash">git clone <span class="nt">--depth</span> 1 https://github.com/hardkernel/linux.git <span class="nt">-b</span> odroidc2-v3.16.y</code></pre></figure>

<p>If we change into the subdirectory of perf from within the kernel sources and
try to compile the correct version ourselves, we receive another error though:</p>

<figure class="highlight"><pre><code class="language-bash" data-lang="bash">In file included from util/event.c:3:0:
util/event.h:95:17: error: ‘PERF_REGS_MAX’ undeclared here <span class="o">(</span>not <span class="k">in </span>a <span class="k">function</span><span class="o">)</span><span class="p">;</span> <span class="se">\</span>
did you mean ‘PERF_REGS_MASK’?
  u64 cache_regs[PERF_REGS_MAX]<span class="p">;</span>
                 ^~~~~~~~~~~~~
                 PERF_REGS_MASK
  CC       util/evsel.o</code></pre></figure>

<p>As already mentioned, this board is using a rather old kernel version. Thus, we
need to fix this error ourselves by adding another define</p>

<figure class="highlight"><pre><code class="language-cpp" data-lang="cpp"><span class="c1">// tools/perf/arch/arm64/include/perf_regs.h</span>
<span class="cp">#define PERF_REGS_MAX	PERF_REG_ARM64_MAX</span></code></pre></figure>

<p>Afterwards perf can be compiled with a simple make &amp;&amp; make install and we
should be good to go.</p>

<figure class="highlight"><pre><code class="language-bash" data-lang="bash"><span class="nv">$ </span>perf <span class="nt">--version</span>
perf version 3.16.82.g2ddf</code></pre></figure>

<p>I’m also available for software consultancy, training and mentoring. Please
<a href="/#contact">contact me</a>, if you are interested in my services.</p>]]></content><author><name>Kai Wolf</name></author><category term="performance" /><category term="software" /><category term="engineering" /><category term="cpp" /><category term="linux" /><category term="performance" /><summary type="html"><![CDATA[For a current client project I need to get a thorough understanding of the performance bottlenecks for several target architectures, including ARM64. For this, I’ve already ordered an ODROID-C2 development board. This is currently the only ARM64 development board available that also supports Android as far as I am aware.]]></summary><media:thumbnail xmlns:media="http://search.yahoo.com/mrss/" url="https://www.kai-wolf.me/assets/img/blog/tux.webp" /><media:content medium="image" url="https://www.kai-wolf.me/assets/img/blog/tux.webp" xmlns:media="http://search.yahoo.com/mrss/" /></entry><entry><title type="html">My talk at ConanDays 2020 in Madrid</title><link href="https://www.kai-wolf.me/insights/2020/02/12/my-talk-at-conandays-2020/" rel="alternate" type="text/html" title="My talk at ConanDays 2020 in Madrid" /><published>2020-02-12T06:16:45+00:00</published><updated>2020-02-12T06:16:45+00:00</updated><id>https://www.kai-wolf.me/insights/2020/02/12/my-talk-at-conandays-2020</id><content type="html" xml:base="https://www.kai-wolf.me/insights/2020/02/12/my-talk-at-conandays-2020/"><![CDATA[<p>I’m happy to announce that I’ll be giving a talk in March at the
<a href="https://conandays.conan.io/">ConanDays</a> conference in Madrid, Spain. I think this is also
the first time that JFrog is holding this conference. Thus, I’m curious and
excited that I get a change being there. The title of my talk will be
<em>Dependency Management with CMake and Conan</em>. Following is my submitted
proposal for this talk:</p>

<p>The story of (thirdparty) package dependency management for C and C++ based
projects is a story full of misunderstandings, shortcomings and dead-ends. This
becomes most noticeable in the fact that many software projects explicitly
advertise that they do not depend on any other thirdparty software packages.
This is particularly interesting as this doesn’t seem to be an issue in many
other programming languages.</p>

<p>On the other hand, maintaining a large chain of dependencies in a C or C++
based project is typically quite cumbersome and has always been this way due to
ABI compatibility reasons and the large number of different factors that
influence the binary outcome of a compilation process.</p>

<p>Historically, CMake’s answer to this is to either use ExternalProject (or more
recently FetchContent) and gather all dependencies in what is called a <em>superbuild</em>
strategy. However, ultimatively this approach is brittle and hard to maintain
for unexperienced CMake users.</p>

<p>Conan has made a tremendous progress in the last months and years and is finally
usable in CMake based projects in what is typically called a <em>modern CMake-y</em>
way as packages distributed with Conan can now be consumed cleanly without the
need to adjust the build configuration of a project.</p>

<p>This talk will give a short historic overview of former dependency management
strategies, explain best practices for integrating Conan in CMake-based projects
and outline what is technically now feasible once a project has been adapted to
this new standard.</p>

<p>I’m also available for software consultancy, training and mentoring. Please
<a href="/#contact">contact me</a>, if you are interested in my services.</p>]]></content><author><name>Kai Wolf</name></author><category term="conan" /><category term="cmake" /><category term="software" /><category term="engineering" /><category term="cmake" /><category term="dependency-manager" /><category term="cpp" /><category term="conan" /><summary type="html"><![CDATA[I’m happy to announce that I’ll be giving a talk in March at the ConanDays conference in Madrid, Spain. I think this is also the first time that JFrog is holding this conference. Thus, I’m curious and excited that I get a change being there. The title of my talk will be Dependency Management with CMake and Conan. Following is my submitted proposal for this talk:]]></summary><media:thumbnail xmlns:media="http://search.yahoo.com/mrss/" url="https://www.kai-wolf.me/assets/img/blog/conandays-2020.webp" /><media:content medium="image" url="https://www.kai-wolf.me/assets/img/blog/conandays-2020.webp" xmlns:media="http://search.yahoo.com/mrss/" /></entry><entry><title type="html">Managing transitive dependencies with Conan and CMake</title><link href="https://www.kai-wolf.me/insights/2020/01/06/managing-transitive-deps-with-conan-and-cmake/" rel="alternate" type="text/html" title="Managing transitive dependencies with Conan and CMake" /><published>2020-01-06T08:17:19+00:00</published><updated>2020-01-06T08:17:19+00:00</updated><id>https://www.kai-wolf.me/insights/2020/01/06/managing-transitive-deps-with-conan-and-cmake</id><content type="html" xml:base="https://www.kai-wolf.me/insights/2020/01/06/managing-transitive-deps-with-conan-and-cmake/"><![CDATA[<p>Back when I looked into Conan the <a href="/insights/2017/08/18/effective-cmake-talk/">first time</a> in 2017 the
state-of-the-art for dependency management in the C and C++ software development
world consisted of building everything from scratch and checking all
binary artifacts into version control or something similar along the line.
Fortunately, this seems to be changing now with the raise of a proper package
dependency management solution for C and C++.</p>

<p>However, no software is free of bugs and the same holds true for Conan as well.
Back then, when I’ve tried to model a
<a href="/insights/2019/02/13/using-conan-non-intrusive-in-cmake-projects/">simple, single dependency for a project</a>, this tool has
failed me as it wasn’t able to resolve transitive dependencies.
<a href="https://github.com/conan-io/conan/issues/4467">This issue</a> in particular has since been resolved, but managing
several, inter-depending software packages in a given project using Conan and
CMake still challenging.</p>

<p>I’ve recently produced and published a specially configured <a href="https://vtk.org/">VTK</a> package
for a medical project I’ve worked on for a client. For this I’ve setup VTK
that it uses another (Conan) package, published by me. Thus, both dependencies
(VTK and <a href="https://github.com/intel/tbb">TBB</a> in this case) were both distributed using Conan and the
first one was depending on the second one. Both dependencies are using CMake
for managing their build system. However, in VTK’s CMake configuration there
is a slight <em>imperfection</em> as it doesn’t simply link against TBB as yet another
logical build target, but it tries to resolve this dependency in a dedicated
<code class="language-plaintext highlighter-rouge">FindTBB.cmake</code> script file. This eventually leads to hard coded paths in the
VTK package as-is when it gets build on a dedicated server. Obviously, this
will not work when this package gets consumed by a client due to the hard
coded path references that will most certainly be different on any other
machine.</p>

<p>The fix for this is either trying to patch VTK’s CMake configuration file,
which may takes a while or won’t even be accepted upstream, or swapping
the hard coded paths to TBB with a reference to where Conan put the TBB
dependency. This can be done as follows:</p>

<figure class="highlight"><pre><code class="language-python" data-lang="python"><span class="k">def</span> <span class="nf">cmake_fix_tbb_dependency_path</span><span class="p">(</span><span class="bp">self</span><span class="p">,</span> <span class="n">file_path</span><span class="p">):</span>
    <span class="k">with</span> <span class="nb">open</span><span class="p">(</span><span class="n">file_path</span><span class="p">,</span> <span class="s">'r'</span><span class="p">)</span> <span class="k">as</span> <span class="nb">file</span><span class="p">:</span>
        <span class="n">file_data</span> <span class="o">=</span> <span class="nb">file</span><span class="p">.</span><span class="n">read</span><span class="p">()</span>

    <span class="k">if</span> <span class="n">file_data</span><span class="p">:</span>
        <span class="c1"># Replace the target string
</span>        <span class="n">tbb_root</span> <span class="o">=</span> <span class="bp">self</span><span class="p">.</span><span class="n">deps_cpp_info</span><span class="p">[</span><span class="s">"tbb"</span><span class="p">].</span><span class="n">rootpath</span><span class="p">.</span><span class="n">replace</span><span class="p">(</span><span class="s">'</span><span class="se">\\</span><span class="s">'</span><span class="p">,</span> <span class="s">'/'</span><span class="p">)</span>
        <span class="n">file_data</span> <span class="o">=</span> <span class="n">re</span><span class="p">.</span><span class="n">sub</span><span class="p">(</span><span class="n">tbb_root</span><span class="p">,</span> <span class="sa">r</span><span class="s">"${CONAN_TBB_ROOT}"</span><span class="p">,</span> <span class="n">file_data</span><span class="p">,</span> <span class="n">re</span><span class="p">.</span><span class="n">M</span><span class="p">)</span>

        <span class="k">with</span> <span class="nb">open</span><span class="p">(</span><span class="n">file_path</span><span class="p">,</span> <span class="s">'w'</span><span class="p">)</span> <span class="k">as</span> <span class="nb">file</span><span class="p">:</span>
            <span class="nb">file</span><span class="p">.</span><span class="n">write</span><span class="p">(</span><span class="n">file_data</span><span class="p">)</span></code></pre></figure>

<p>This fix will be sufficient for my use case, as I can ensure that both
packages will be consumed from Conan. That being said, this is far from
a common solution for these types of problems. Furthermore, In my experience
these types of issues will come up from time to time and fortunately in this
case it happened for a rather simple transitive dependency chain that wasn’t
that hard to debug and fix. I can imagine though, that things do look a
bit different as soon as the number of (inter connected) dependencies do
increase.</p>

<p>There will be a <a href="https://conandays.conan.io/">Conan conference</a> in March this year that
I’m planning to attend. I really appreciate the patience and effort of
the people that are actively working on Conan and hopefully and I’ll be
able to address a few open issues I have with this tool as well.</p>

<p>I’m available for software consultancy, training and mentoring. Please
<a href="/#contact">contact me</a>, if you are interested in my services.</p>]]></content><author><name>Kai Wolf</name></author><category term="conan" /><category term="cmake" /><category term="software" /><category term="engineering" /><category term="dependency-manager" /><category term="cpp" /><category term="conan" /><summary type="html"><![CDATA[Back when I looked into Conan the first time in 2017 the state-of-the-art for dependency management in the C and C++ software development world consisted of building everything from scratch and checking all binary artifacts into version control or something similar along the line. Fortunately, this seems to be changing now with the raise of a proper package dependency management solution for C and C++.]]></summary><media:thumbnail xmlns:media="http://search.yahoo.com/mrss/" url="https://www.kai-wolf.me/assets/img/blog/conan-cmake.webp" /><media:content medium="image" url="https://www.kai-wolf.me/assets/img/blog/conan-cmake.webp" xmlns:media="http://search.yahoo.com/mrss/" /></entry></feed>